Here is the bonnet:
 |
| forgive my model she is 30 years old |
The wool that I used was 2 x 50 gram 4 ply and is the colour cream with flecks of pink and blue through it ( I was actually given this wool from a dear friend who no longer crochet/knits so I am not sure where you can buy it). The hook that I used was a 3.50mm/E4. For the tie, 38 inch piece of cord/ribbon/lace, whatever you would like.
Pattern:
(Now as this is my first pattern please be patient with me and if there is anything that doesn't make since or any questions you may have please do not hesitate to ask and I will try my best to provide an answer and correct any errors)
With E4/3.50mm hook make 62 chain (main part should measure 11 1/2 inches long and 4 1/2 inches wide when finished).
Row 1: 1 double crochet into third chain from hook and continue to end. 2 chain then turn (count chain as first double crochet)
Row 2: work *double crochet in each chain till end, 2 chain then turn**(work this pattern *to** till piece is 4 1/2 inches wide)
 |
| this is what your piece should look like when finished (except for the frill that's next, sorry forgot to take picture) |
Frilled Edge:
Continuing from last row: 2 chain then turn (count as first stitch) in same stitch at the bottom of the 2 chain, 1 double crochet, 1 treble crochet, 1 double crochet, 1 single crochet (pattern should have 5 stitches in 1 chain). Then in next chain slip stitch. Next stitch work *1 single crochet, 1 double crochet, 1 treble crochet, 1 double crochet, 1 single crochet. Next stitch, slip stitch**. Work * to ** till end and fasten off (I ended up with 27 patterns for the frill).
Hope you are keeping up with this so far!
Now to sew the bonnet together to create the back before we do the bottom part for the tie.
Fold your piece in half like so:
Now place a pin at 4 inches as we are going to create a T shape as per the original:
 |
| back of bonnet |
 |
Your bonnet should look like this with out the bottom part for the cord:
Bottom of the bonnet:
As the bottom of the bonnet is the finished edge you will need to create a row of single crochet all the way along. When you get to the end work 2 chain and turn.
Then in the top of each chain work a double crochet to the end, 2 chain then turn. Continue on with this pattern for another 4 rows (should be first row single crochet, 4 rows double crochet).
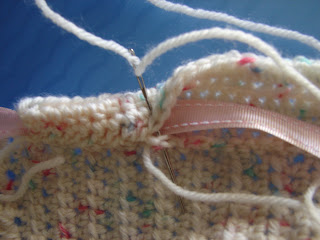
Now I did not have any cord for the tie so I used a pretty pale pink ribbon. You can sew the bottom of the bonnet first and then push the cord through later using a safety pin but I chose to sew the ribbon in. Fold the bottom of the bonnet and sew to the single crochet row like so:
And there you have it, your very own baby bonnet!!
 |
| Poor old Josephine, I have had her since I was about 3. |
I think this bonnet would be for a newborn to 3 months. Of course if you wish this to fit a bub that is 3 to 6 months I would just make the width of the bonnet wider by just adding a few more rows.
I hope you can understand the pattern and I would love to hear any feedback and please I would love for you to send me a picture of your finished bonnet.
Happy Crocheting!!!!!!


how I wish I can crochet... thanks for linking up and I hope to see you again this week! have a nice weekend! ^^)
ReplyDelete