Showing posts with label sewing. Show all posts

Tuesday, June 12, 2012

Tutorial Time


Babushka Clutch pattern from Spotlight

DSC08059

When my niece turned 11, Miss G wanted me to make her a little bag from a pattern that we picked up at Spotlight.  It is called the Babushka Clutch.

E15_12_babushka_clutch_keyring_ps

She also picked the material to use as her cousin loves purple.  It’s the easiest little clutch to make and you can download the pattern from the website.  The pattern needs to be printed at 200%.  Instructions are provided.

But this is what you should end up with:


DSC08022


  • outer fabric, lining and interfacing for the main part of the pattern
  • outer fabric, lining and interfacing for the lower front section
  • magnetic closure

I have never made a clutch or used a magnetic closure so this was really fun and a challenge even though the pattern was simple.  I had visions of the closure not matching up.

I also added a little handle to this pattern that I cut out as 10 inches in length, 2.5 inches wide and folded it in half after I sewed it together. I used the two fabrics and interfacing for strength.

And as a little something extra, I also made a matching little zipper pouch to be placed inside the bag.

DSC08058

Miss G also wanted one of these for herself and so we have picked up some of the Babushka fabrics that is now available at Spotlight that is shown in the top picture.

So have some fun with this little clutch.  There is so much you could do with this.  Add a zipper or mobile phone pocket inside or you could make the closure a zipper instead of a magnet which is what I am thinking of doing for Miss G.

Would love to see what you come up with!

Happy Sewing!!!

Wednesday, May 30, 2012

My next challenge


Here is my next challenge and the biggest pillowcase I have ever made to date.  We threw out the old cushion base for the day bed awhile ago and used a queen size foam mattress cut in half. 

I picked up some outdoor fabric from Ikea at a bargain price, now just to make the cover with it.  I think I will just do the envelope style and will have to wait till the little man has a nap so that I can lay it out on the floor to cut and pin.

DSC07837

Wish me luck!

Over at Bits & Bobs 4 Bubs


I have done a little tutorial over at my other Blog, Bits & Bobs 4 Bubs!!

DSC07843

DSC07853

Have a great day!

Monday, May 28, 2012

Tutorial Time!!!


OLD BEAN BAG TO NEW FLOOR CUSHION

A very good friend of mine gave my girls 2 Barbie bean bags that her own two girls had grown out of.

DSC07791

The were practically brand new and the girls loved them.  We would snuggle up together on those cold winter mornings under a blanket and watch the cartoons.

But now they are looking very sad and unloved and my girls don’t sit on them anymore.  Plus they need more stuffing.  So after I picked up 2 metres of an owl pattern curtain fabric I thought I would retire the poor old bean bags and make the girls floor cushions.

DSC07795

To make the cushions I cut a piece a fabric at 23 inches wide by 51 inches long with the extra 1 inch being for seam allowance.  I want the cushion to end up a 20 inch square that is 3 inches deep.

For the closure I am using a couple of open end zips that I picked up at a charity shop ages ago for a steal.  I want the opening to be 15 inches wide so I marked and sewed across the bottom of the zip and cut off the end leaving about an inch extra and then I used my zigzag stitch, as wide as the stitch can be and secured the other end.

DSC07799

Next I folded the fabric with right sides together, marked in 4 inches each side (this is so I have room to make the box corner) and attached one side of the zip to the fabric.  For a great tutorial on how to sew on a zipper click here.

DSC07802

DSC07803

Now here is where I attached a handle to the pillow.  As this curtain material is pre-hemmed I just cut off the end folded it in half and sewed it together.

DSC07796

I wanted the handle on the side of the cushion so I folded the material in half length ways and then measured down and marked about 23 inches. Then I folded the handle in half, marked and then matched this to the mark on the cushion. Now I just turned each end of the handle down and pinned it to the cushion.

DSC07806

DSC07809

DSC07812

Next I sewed both sides together.  Don’t forget when you are sewing completely around the cushion that you either leave a hole for turning the cushion out the right way and then hand sew it closed or just leave the zipper open part of the way.

Before I turned the cushion cover right side out I flattened the corners our and measured 1.5 inches down the middle, marked and sewed straight across to make the boxed corners.  I did this to all four corners.

DSC07822

DSC07823

Now to just cut off the corners, turn it right way out and fill it with the Styrofoam balls from the old bag.  And how did I do this, well I used one of my litre jugs.

DSC07830

And here she is.  One more to go!

DSC07835

And here it is in use lol!

DSC07839

Happy Sewing!!!

Saturday, May 26, 2012

Found it at the Library


Create 25 wearable garments from just 8 simple patterns, that is what ‘Simple Modern Sewing’ by Shufu To Seikatsu Sha is all about.

411mr-eHy L__SL500_AA300_

This is a new book to the library and one that I personal don’t think I would make anything from but I just love looking through these new books to see what the latest thing is.

DSC07589

In the first half of the book you will see each pattern and how you can make 3 different versions of that particular pattern.

DSC07588

Then at the back it illustrates how you lay the pattern on your fabric and then how to sew it all together.

DSC07590DSC07591DSC07592

Patterns are provided at the back on paper.

What’s new at your library

Happy Sewing!!!!

Tuesday, May 22, 2012

Very Late Tutorial Wednesday (lol)


Hello everyone, how was your weekend.  Mine was busy with attending a baby shower, working in the garden, Granny coming to stay and a very sick little boy who has started walking!!!

So I hope this tutorial was worth the wait as it has been something that I have been wanting to make for the girls for a while.

Every time we visit the library I always think to myself “I must make the girls a library bag” and I wanted it to be something that was handy but not in the way so I decided to make them a library bag wallet.

Yep that’s right, a drawstring library bag that folds down to a wallet and I can put in the console of the car and have it handy when we next visit the library.

So here it is:

Library Bag Wallet

The finished bag measures 16 inches by 16 inches and the pocket measures 8 inches by 9 inches.

So you will need to cut your main fabric as 32 inches in length plus 3 inches for seam allowance (35 inches in length).

The pocket I cut as 8 1/2 inches by 9 1/2 inches, I used a 20 inche long zipper and I cut the cord/ribbon at a length of 36 inches.


21052012735

Now to get started:

With the main fabric for the bag, I serged all sides first but if you don’t have a overlocker you can use the zigzag stitch or just cut your fabric out with pinking shears.

Now to sew the zipper to the pocket first. With the fabric that I cut out for the pocket I first ironed a seam of 1/4 inch all the way around:

21052012753

Then with the zipper I  sewed across the end so that it will not come apart:

21052012740

(some photo’s were taken using my mobile as the batteries were flat on my camera. Sorry for the poor quality)

Then I opened the zipper all the way out:

21052012743


Normally when sewing a zipper to fabric you sew the material with wrong side facing up and then you iron the fabric down and top stitch, but  I am sewing the zipper all the way around, that is why I have ironed the seam down first (hope that makes sense).

With the seam now ironed down, fold the fabric in half and mark the middle.  The following picture shows how the wallet is going to look once the zipper is on:

21052012759

Half of the zip goes on either side of the fabric.  Now I found it easier to pin it all the way around and then sew it  on because if you don’t have the bottom and the opening directly where you have marked the middle of each side then the pocket will not be even and it will not zip properly, like this:

FAIL

21052012760

So start with the bottom of the zipper and then work it all the way around. Sew zipper on using your zipper foot:

21052012756


21052012757


With your finished pocket it is now time to stitch it to your library bag. So with right sides of fabric together measure in 3 1/2 inches by 3 1/2 inches in at the corner, pin and sew the pocket to the top fabric only.  I only sewed the sides and bottom so that the top was left open to be used as a pocket when the bag is not folded away:

DSC07703

DSC07703 1

To finish the library bag, first I folded the bag in half, wrong side facing each other and sewed one side only together.  Then using my hem ruler I marked the top seam for the cord to be threaded through 1 1/2 inches down and sewed.

21052012736

After you have done this pin and sew the other side of the library bag together but start about 1 inche below where you sewed the top seam for the cord to thread through:
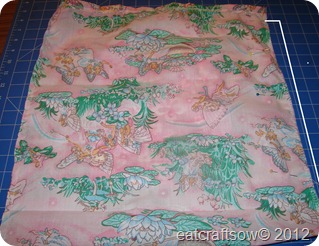
DSC07705

Now to thread the cord through.  I found it easier to thread the cord using a safety pin but first I placed a small amount of sticky tape around the end (a bit like making the top of a shoe lace) then put the pin through the sticky tape:
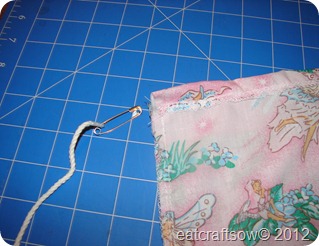
DSC07707

Now to just tie the ends together and here you have it a library bag that folds down to a wallet and here is how to fold it:


DSC07723DSC07712

DSC07713DSC07716DSC07717

All ready to go to the library:

DSC07721

Well I hope you like the tutorial and it was worth the wait.  If you have any questions I will be only to happy to answer them for you.

Happy Sewing

Thursday, May 17, 2012

Found it at the library


I found this book while at the library waiting  on the girls to choose something to read and it reminded me of the fabric balloon ball.

DSC07586

Patchwork Puzzle Balls was written by Jinny Beyer who is one of America’s most popular quilt designers.

DSC07578

DSC07577

The book is filled with lots of different patterns for you to choose from to make your very own fabric puzzle ball.

DSC07574

DSC07582

It has step by step instructions that are very easy to follow and plenty of pictures. And there are templates in the back.

DSC07585

So if you are looking to make your own fabric balloon ball why not checkout your local library and see if this book is available.

Happy Reading