Hello everyone, how was your weekend. Mine was busy with attending a baby shower, working in the garden, Granny coming to stay and a very sick little boy who has started walking!!!
So I hope this tutorial was worth the wait as it has been something that I have been wanting to make for the girls for a while.
Every time we visit the library I always think to myself “I must make the girls a library bag” and I wanted it to be something that was handy but not in the way so I decided to make them a library bag wallet.
Yep that’s right, a drawstring library bag that folds down to a wallet and I can put in the console of the car and have it handy when we next visit the library.
So here it is:
Library Bag Wallet
The finished bag measures 16 inches by 16 inches and the pocket measures 8 inches by 9 inches.
So you will need to cut your main fabric as 32 inches in length plus 3 inches for seam allowance (35 inches in length).
The pocket I cut as 8 1/2 inches by 9 1/2 inches, I used a 20 inche long zipper and I cut the cord/ribbon at a length of 36 inches.

Now to get started:
With the main fabric for the bag, I serged all sides first but if you don’t have a overlocker you can use the zigzag stitch or just cut your fabric out with pinking shears.
Now to sew the zipper to the pocket first. With the fabric that I cut out for the pocket I first ironed a seam of 1/4 inch all the way around:

Then with the zipper I sewed across the end so that it will not come apart:

(some photo’s were taken using my mobile as the batteries were flat on my camera. Sorry for the poor quality)
Then I opened the zipper all the way out:

Normally when sewing a zipper to fabric you sew the material with wrong side facing up and then you iron the fabric down and top stitch, but I am sewing the zipper all the way around, that is why I have ironed the seam down first (hope that makes sense).
With the seam now ironed down, fold the fabric in half and mark the middle. The following picture shows how the wallet is going to look once the zipper is on:

Half of the zip goes on either side of the fabric. Now I found it easier to pin it all the way around and then sew it on because if you don’t have the bottom and the opening directly where you have marked the middle of each side then the pocket will not be even and it will not zip properly, like this:
FAIL

So start with the bottom of the zipper and then work it all the way around. Sew zipper on using your zipper foot:


With your finished pocket it is now time to stitch it to your library bag. So with right sides of fabric together measure in 3 1/2 inches by 3 1/2 inches in at the corner, pin and sew the pocket to the top fabric only. I only sewed the sides and bottom so that the top was left open to be used as a pocket when the bag is not folded away:


To finish the library bag, first I folded the bag in half, wrong side facing each other and sewed one side only together. Then using my hem ruler I marked the top seam for the cord to be threaded through 1 1/2 inches down and sewed.

After you have done this pin and sew the other side of the library bag together but start about 1 inche below where you sewed the top seam for the cord to thread through:

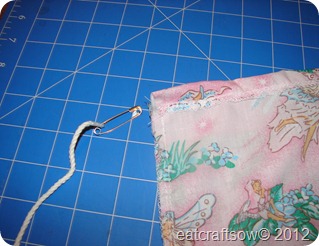
Now to thread the cord through. I found it easier to thread the cord using a safety pin but first I placed a small amount of sticky tape around the end (a bit like making the top of a shoe lace) then put the pin through the sticky tape:
Now to just tie the ends together and here you have it a library bag that folds down to a wallet and here is how to fold it:


All ready to go to the library:

Well I hope you like the tutorial and it was worth the wait. If you have any questions I will be only to happy to answer them for you.
Happy Sewing


